Original price
$2,979.95
-
Original price
$4,594.95
Original price
$2,979.95
$2,979.95
-
$4,594.95
Current price
$2,979.95
| /
Why Buy from Indoor Golf Pros?
Enjoy personalized support from golf experts, genuine products backed by full warranties, free shipping, no sales tax in 30+ states, and a price match guarantee.
When you shop with Indoor Golf Pros, you're choosing premium quality, trusted service, and unbeatable value for your indoor golf needs.
Engineered for indoor golfers who demand nothing but the best. Whether you're a scratch golfer or just like to play one in your basement, Carl's Pro Golf Enclosure Kits are the perfect blend of rugged durability and refined design. With a premium golf screen that seamlessly meets the floor, you’ll enjoy an immersive golf experience with just the right touch of bounceback—and plenty of room for bragging rights.
Engineered for Upscale Golf Simulator Installations
Carl's Pro Golf Enclosures allow for large bays (20' wide or 20' deep). They're perfect for commercial golf simulators, golf lessons, and luxury homes. Allow your turf to lead seamlessly up to the premium triple-layer golf impact screen. Without a bottom border, you'll get the most immersive golf simulator experience possible.
Standard features include: a black knit fabric enclosure, connector fittings that fit 2" EMT pipes (pipes sold separately), and a premium golf impact screen. Whether you choose all the bells and whistles or just the basics this product will bring your indoor golf simulator to life!
Escape Golfing Hazards
Steer clear of water hazards and safety hazards alike with Carl's Pro Enclosures. The innovative golf impact screen system uses releasable zip ties and a bottom cable, preventing most golf ball bounceback. And all the practice hours you'll get in! Get ready for a no-bounceback, stay-in-the-fairway kind of golf experience.
DETAILS
Crafted from top-tier materials, you can install this Pro Golf Enclosure in a commercial golf simulator or an upscale home. With hand-sewn golf screens and deep bays, these professional golf enclosures are both durable and beautiful. Carl's Pro Golf Simulator Enclosures will make an indoor space feel like you are truly on the golf course.
INCLUSIONS
Premium Golf Impact Screen
Made of three layers of heavy-duty, tight-knit impact-resistant polyester. This is the smoothest surface available on a full-impact material. Plus, Carl's innovative cabled design lets the image go all the way to the turf for a truly golfable space.
Black Knit Enclosure
Black knit fabric surrounds your enclosure, shading your screen for a bright, clear image. The ceiling and side panels catch any errant shots, and with the smooth, black finish, they look good doing it.
Steel Fittings
The Pro Golf Enclosure Kit includes the steel fittings and elbows to construct all frame joints and corners. Pipes sold separately.
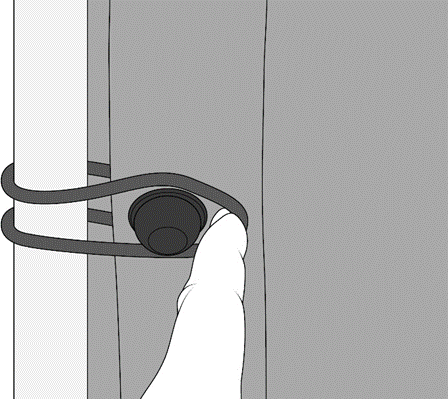
Ball Bungees and Zip Ties
We include all the fasteners you need to secure your enclosure and screen. Zip ties provide you with a plethora of options for tensioning your impact screen. And we give you enough ball bungees to find the perfect balance of tension for your specific swing style. Depending on how close you're hitting to the screen, ball speed, clubs used, and spin rates, you can adjust them all to find your sweet spot between tension and slack.
ASSSEMBLY VIDEO
EMT Requirements
Unless you've selected the Pipe Framing Kit add-on, you'll need to purchase 2-inch EMT (electrical metal tubing) from your local hardware store to complete your frame. We'll include all details on what lengths and quantities of EMT are required. Please note, 2-inch EMT is the US trade name of the material, however, the true outer diameter is 2.197″ or 55.8mm.
FAQ'S
How far away should I stand from my impact screen?
For the safety of both the golfer and the screen, we recommend standing a minimumof 10-12 feet away from the screen.
Can I iron or steam a golf impact screen?
We do NOTrecommend ironing your golf screen, simply because it is very easy to damage the screen. And we want your golf screen to last you a long, long time. With wrinkles and fold marks, the best thing is prevention. Unpack your new screen immediately, and if you need to store it, fold it very loosely. But if you're reading a section on ironing your golf screen, it's probably too late for prevention. Know that mounting your golf screen to a frame with tension, like with our zip ties or ball bungees, and letting it relax for a couple of days will smooth out most wrinkles.
That being said...
We have also had success using a steamer to help get wrinkles and folds out. Using a clean, consumer-grade steamer with distilled water will help accelerate the wrinkle removing process, and should avoid leaving water marks on your screen.
Are there safety concerns when using a golf simulator?
We want your indoor golf set up to be fun, help improve your game, and be safe for everyone.
Make sure to follow the assembly manual provided with your enclosure.
Keep children, pets, and spectators out of swing range.
Understand the Terms of Sale of using a Carl's Place product.
Do I need to use a golf hitting mat?
Golf hitting mats give you a nice cushy surface to stand and swing your golf club. They help protect your joints from any impact during your swing. They also let you have a more realistic golf practice when you can tee up the golf ball at the perfect height and swing freely.
When choosing a size for your golf mat consider the golfer's needs. A size of 4'x5' will let most golfers swing a driver with their heels comfortably on the edge of the mat. A larger size, 5'x7' or 4'x9', would be able to accommodate golfers with a wide stance or if you have friends over swinging either rightie or leftie.
Golf Enclosure Information:
What is the difference between Carl's Enclosure Kits?
Carl's DIY Golf Enclosure Kit offers you an easy, entry-level way to build a safe place to swing your clubs. An affordable, convenient kit, the DIY Enclosure Kit helps home golfers take the guesswork out of designing their own golf simulator.
Carl's Pro Golf Enclosure Kit is a higher-end enclosure for top-of-the-line performance in a golf simulator. Because it's available in wider, deeper bays with additional safety features it makes the best commercial golf simulator enclosure.
Carl's Curved Golf Enclosure Kit takes the Pro Enclosure’s sturdy design to the next level, adding a seamless curved screen for a truly immersive experience. Its unique structure surrounds the golfer, creating a lifelike, panoramic view that’s as impressive as it is functional.
How much space do I need for the enclosure?
When measuring for a golf simulator, make sure you take into account:
Buffer space: You don't want your golf simulator right up next to any walls or ceiling. Balls that contact the walls or ceiling can cause damage and have unwanted bounce back.
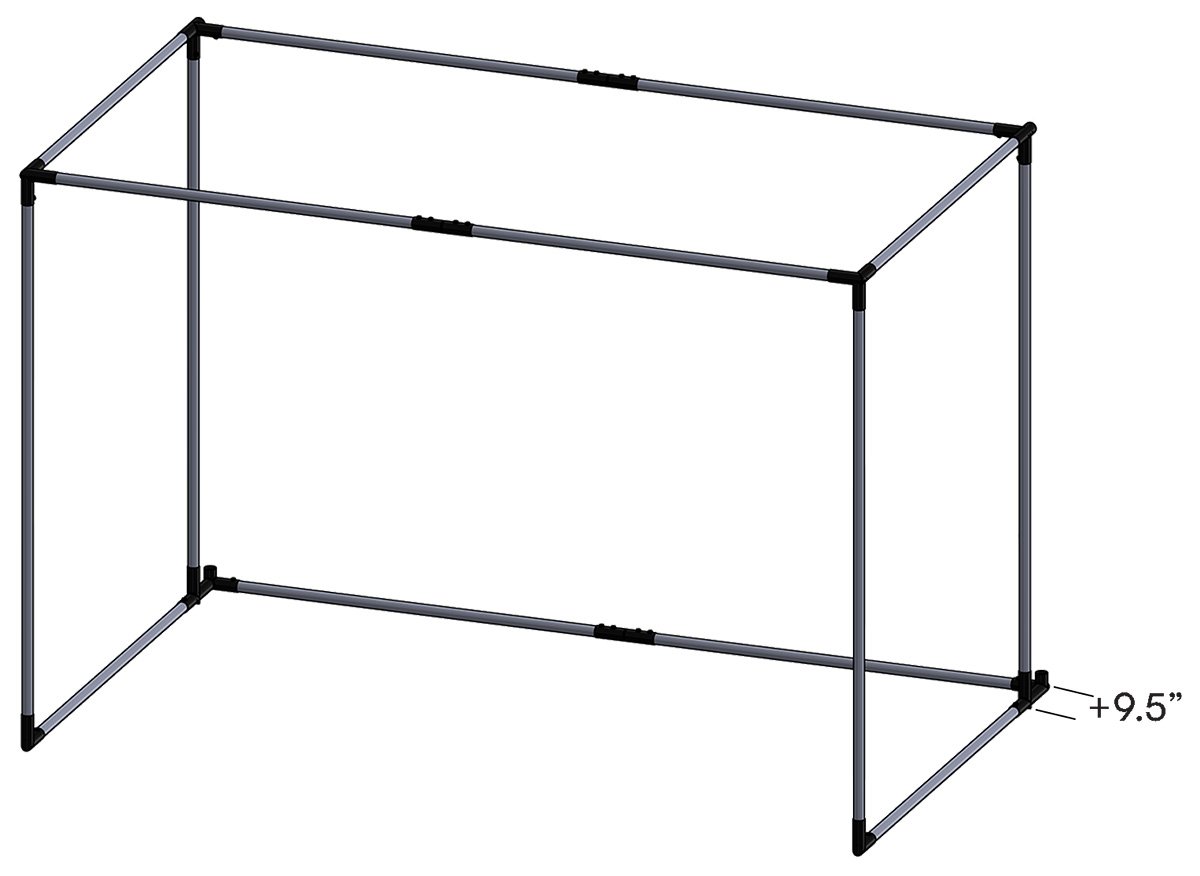
Footprint of the golf enclosure: Make sure to check the actual dimensions of the enclosure footprint. Our C-Series enclosures have built-in buffer space in the rear with the backset rear fitting.
Safe golfing distance away from the screen: For the safety of both the golfer and the screen, we recommend standing a minimum distance of 10 to 12 feet away from the screen.
Height of the golfer(s)
Length of the golf club(s)
Turf thickness, heating ducts, and soffits
Furniture and access to doorways
When will my enclosure ship?
Ourgolf enclosure kitsare made to order (which is why we can customize them down to the inch!). We make sure they are measured, sewn, and packed perfectly before they are ready to ship. Because of that, production lead time may fluctuate based on volume. To see the expected shipping and delivery times, please add the item to your cart and enter your shipping information.
What if the black enclosure material gets hit with a golf ball?
The enclosure material is not designed to take a direct hit from a golf ball. However, if you hit the white impact screen, and it bounces and hits the enclosure, you should not experience any issues.
Can I get a replacement screen for the enclosure?
We can easily make you a replacement screen to save you money. Replacement screens can be ordered by contacting one of our Customer Service Team Members.
How big is the enclosure?
The Resources section lists actual frame dimensions to guide you in determining which enclosure is the right fit for your space.
Note how the C-Series enclosures have a backset rear fitting. This creates a footprint 9.5" deeper than the listing size. Bonus! You needed that buffer space anyways so your hard-hit golf balls don't contact the wall. It's just built into the enclosure footprint.
Layouts may vary. Deeper enclosures will have a crossbar in the middle.
Installation:
What pipes do I need to construct the enclosure kit frame?
Our Pro Golf Enclosuresrequire 2-inch EMT ((Electrical Metal Tubing/Conduit). We recommend you add a Pipe Framing Kit to your order so you get pre-cut, perfectly sized, and marked pipes for your enclosure frame. That way all you have to do is assemble your frame and enclosure.
Note, these pipes can be difficult to source locally. Be sure you can purchase it near you before making your final buying decision. Either way, we will provide a diagram indicating the required cut lengths for your specific size kit.
Pro Enclosure orders with a 'Pipe Framing Kit' ship freight. If you are unable to unload a pallet of 50lb boxes, youshould add lift gate service. If you are outside of the US, freight shipping the Pipe Framing Kit may be cost-prohibitive.
How long does it take to assemble the enclosure?
Carl's Place Pro Golf Simulator Enclosure Kits assemble in approximately 3 hours. It's best if you have a couple helpers, especially for lifting and connecting pipes for the frame. See this How to Assemble the Pro Enclosure article for more info.
What are EMT pipes?
EMT stands for Electrical Metal Tubing, also known as, Electrical Metal Conduit. We often just refer to them as pipes on our website. You need EMT (pipes) to build the frame for your enclosure/screen. Do not mistake PVC pipes for EMT. PVC will not work with our fittings. You have 2 options on how to get the necessary pipes:
Add a Pipe Framing Kit. (You'll see these as accessories on our DIY and Pro Golf Enclosure Kits.
Source EMT pipes at your local building supply store.
DIY Enclosures require 1″ EMT.
Pro and Curved Enclosures require 2" EMT which can be more difficult to find. Make sure you have a source for your EMT when selecting whether you want to add on our Pipe Framing Kit options.
Where and how should I mount my projector?
The projector specifications determine the maximum image size and how far from the screen it will need to be mounted. Check out ourscreen size calculatorto find the best mounting location.
As for how to mount your projector, here are the places to put a golf simulator projector.
Mount a projector above your tee or mat.
Flush-mountto your ceiling in spaces with lower ceilings
Drop-mountfrom your ceiling in spaces with higher ceilings
Place a short-throw projector on the floor inside the golf simulator. Of course, if you floor-mount your projector youmustbuild orbuy a protective covertokeep it safe from golf balls and clubs.
I had an amazing experience with Indoor Golf Pros. I purchased a Sim-Booth first. Had a few questions and Ari was right on top of it for me. A few weeks later, I purchased a Uneekor Eye X02 from Ari. I got a great price and peace of mind. It couldn’t have gone any smoother. I highly recommend any indoor golf purchase you should go through Indoor Golf Pros.
Got the projector mount and half walls as add ons. Has solid side and top panels with a pre-fab sim, which I hadn't seen before. Took 2-3 weeks to arrive. Ari from IndoorGolfPros was extremely communicative and responsive, and helped to coordinate some specific logistical requests I had around shipping and delivery. Great service and experience overall.